Writing UAS Applications
A UAS application is an application that is loaded into and run by a UAS.
It is simply a Java class packaged in a jar file that references
com.aculab.uasapi and adheres to a few rules.
Each time a UAS application is run it instantiates a class that handles a single primary call
and optionally a small number of secondary extra call channels. It is presented with the call
channel objects that control these calls.
While a call is answered various speech processing features can be
performed on it. Once the call is hung up the application should return. The overall result of
the application run is returned to the UAS and logged.
See
Class Diagram.
Note: Applications currently need to be built using JDK 1.7.
Application Rules
A UAS application is a Java class that adheres to certain programming rules and is
packaged in a jar file together with a manifest.
UAS Application File Specification:
- The name of the jar file (without extension) is the application name.
- The jar file MUST include a manifest file containing headers:
Implementation-Title and Implementation-Version
- The jar file MUST include an application class with the same name as the jar file
- The application class MUST inherit from either
UASInboundApplication
or
UASOutboundApplication.
- The application class MUST override the abstract
run method that returns an
integer indicating the overall success of the application invocation.
- The application class may provide a default constructor.
- The application class may provide implementations for the static methods
onLoad and onUnload methods.
The entry point for application is the
run method. Its prototype is:
Inbound:
@Override
public int run(UASCallChannel channel, String applicationParameters)
Outbound:
@Override
public int run(UASCallChannel channel,
                        String applicationParameters, String outboundParameters)
Where:
channel - the primary call channel.applicationParameters - a string containing parameters associated with the application
(defined in the Inbound or Outbound Service Registration pages on
cloud.aculab.com).outboundParameters - a string containing parameters related to a specific invocation
of the application. Typically this includes the outgoing call destination address.
Return Code:
The return code should adhere to the following restrictions:
- 0 or any positive integer: the application passed. The exact meaning is application specific
- -1 to -99: the application failed, reserved for UAS use
- -1: the application instance has thrown an exception
- -2: the incoming call was hung up before the application instance was invoked
- -3: the specified application is not currently loaded
- -4: the specified application cannot be run
- -5: the application instance returned a reserved value
- -6: the specified application is Inbound, but the call is outbound (or vice versa)
- -7: the UAS is not currently accepting new application requests
- -9: UAS error while processing application request
- any other negative integer: the application failed. The exact meaning is application specific
Creating a UAS Application
The install package contains two java source files that can be used
as a starting point for developing new UAS applications (see [UASInstallDir]/Templates/).
Also included are example manifest files and Ant build script files.
Here are step-by-step instructions for creating UAS applications using Eclipse and NetBeans.
Using Eclipse to Create UAS Applications
This explains how to create a Java UAS Application project
in the Eclipse IDE and packaging it in a jar file using Eclipse or Ant.
Creating a UAS Application Project in Eclipse
- Create an empty project:
Select New - Java Project and in the Create a Java Project dialog
create a folder for the project and a project name.
(note: JRE must be 1.7) Select Next.
In the Libraries tab: Select Add External JARs...
Browse to [UASInstallDir]/Repository/ and select uasapi-release.jar.
Select Finish.
- Add the class and manifest files:
In Package Explorer right-click on your new project
Select Import - General - File System and browse to [UASInstallDir]/Templates/NewInboundApp
(or NewOutboundApp). Enable the folder's tick box. Select Finish.
Your project should now also contain NewInboundApp.java (or NewOutboundApp.java),
MANIFEST.MF and build.xml files.
- Refactor for your application name:
Refactor - rename the NewInboundApp or NewOutboundApp class to the
name of your application. (switch on "Update fully qualified names in non-java text files")
to ensure the manifest file is also updated.
You can also change the containing package name (default: com.customer.uas.app).
Using Eclipse to build the application jar file
- Specify the Jar file name and contents:
In Package Explorer right-click on your application project
Select Export - Java - JAR file, untick the .classpath, .project, build.xml and MANIFEST.MF files
and set the export destination to your application name with ".jar" extension in the bin
folder of your project.
Select Next until the JAR Manifest Specification dialog is displayed.
- Include the Manifest file in the Jar file:
Specify Use existing manifest from workspace and browse to the MANIFEST.MF file
in your project.
Select Finish.
Using Ant to build the application jar file
- Create an Ant Builder:
In Package Explorer right-click on your application project
Select Properties - Builders - New - Ant Builder and give the builder a name
Set the Buildfile - Browse Workspace to your project and select the build.xml file
-
Selecting Build Project on your application will now also create a jar file in the bin folder.
Using NetBeans to Create UAS Applications
This explains how to create a Java UAS Application project
in the NetBeans IDE.
- Create an empty project:
Select New Project and select Java Class Library.
Create a location for the project and a project name.
Finish.
- Add the api library:
Right-click on the Libraries folder of the newly-created project,
select Add JAR/Folder and browse to [UASInstallDir]/Repository/ and select uasapi-release.jar.
- Add a source package, the java source file and manifest:
Right-click on the Source Packages folder and select New - Java Package.
Enter the package name com.customer.uas.app and select Finish.
From File Explorer copy one of the two template app java files (NewInboundApp.java or NewOutboundApp.java)
and paste it into your new source package in NetBeans.
From File Explorer copy the MANIFEST.MF file
and paste it into the root folder of your project in NetBeans.
Edit the /nbproject/project.properties file of your project and add the line
manifest.file=MANIFEST.MF
- Refactor for your application name:
Refactor - rename the NewInboundApp or NewOutboundApp class to the
name of your application.
(you will need to edit the manifest file manually to reflect this change)
You can also change the containing package name (default: com.customer.uas.app).
The Manifest File
The MANIFEST.MF file is included in the UAS application jar file to allow the UAS
to control whether/how the application is loaded.
The UAS expects two standard headers to be set:
e.g.
Implementation-Title: com.acompany.uas.app.AUASInboundApp
Implementation-Version: 1.0.1
If these are not set in the manifest file or the Implementation-Title name does not match
the class name the UAS will not load the application.
UASApplication Base Class
All UAS applications inherit from
UASApplication.
This class returns a property via method
getApplicationInstanceId() that uniquely identifies
a particular application instance within the Aculab Cloud (this id is included in diagnostic trace for
each instance).
It returns properties from the methods
getFileManager() and
getTrace() that
provide media file and diagnostic tracing.
It also returns fax documents via
getFaxToSend() and
getFaxToReceive()
that are used when sending or receiving faxes.
Note: These last two properties will be
null
unless Fax Sending or Fax Receiving has been enabled within the service invoking a particular
application instance.
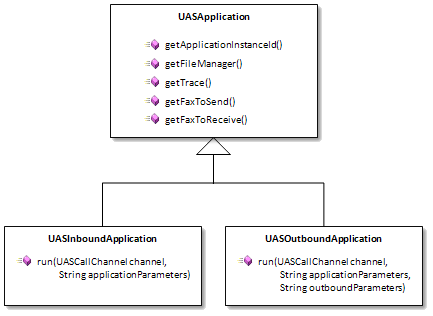
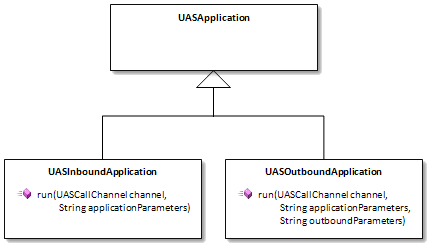
Inbound/Outbound Applications
A UAS application is either inbound or outbound. This refers to the direction of the primary call
to be managed by the application.
An inbound application inherits from
UASInboundApplication
and is passed a call channel on which an incoming call has been detected and is
waiting to be answered (or rejected).
An outbound application inherits from
UASOutboundApplication
and is passed a call channel on which no call is yet active. The application
is expected to make an outbound call attempt within a reasonably short time.
com.aculab.uasapi
The UAS API library is based on the AMS Client API which provides powerful media processing and call control
features via a high-level client API. It allows incoming and outgoing telephone calls to be controlled and
connected together, wav file playback, wav file record, DTMF playback and detection.
The UAS API library (uasapi-x.x.x-release.jar) is installed in the <UAS install folder>\Repository folder.
Applications require this to be specified on their classpath in their manifest file. The supplied sample UAS
applications expect the global Classpath Variable
UASAPI_LIB to be configured to point to this jar file.
UAS applications need to import classes from com.aculab.uasapi and com.aculab.amsapi (the underlying layer).
These assemblies contain classes that control individual telephone calls and associated media processes that
interact with the call. For example, to play a wav file to the call or record the call to file.
This is a synchronous API. Methods that interract with the Aculab Cloud send a message and wait for a response
before returning control to the application.
Application Initialisation
The Java UAS supports one-time initialisation of an application so that any static resources that an
application may use can be initialised. To achieve this a UAS application may optionally implement one
or both of the following methods in its application class:
public static int onLoad();public static void onUnload();
The
onLoad method is called while an application is being loaded. It should return zero or a
positive value to indicate success or a negative value to cancel the loading operation.
The
onUnload method is called by the UAS when an application is unloaded.
Default Constructor
When a UAS is requested to run a loaded UAS application it instantiates the application's class and then calls
the
run method. A default constuctor can optionally be implemented. This will be called immediately
before
run is called.
Diagnostic Trace
The property returned by
getTrace() of
the
UASApplication class provides the ability
to log diagnostic trace to file. The amount of trace
is determined by the
TraceLevel configuration setting for the UAS (the default level is
Error). This can be altered via the UAS Management Console, from where log files can
also be downloaded for viewing.
The log files are written to a location specified by the
TraceLocation configuration
UAS setting. This defaults to
Logs under the installation directory.
The
TraceFileMaxKilobytes and
TraceFileCount configuration settings also
affect how large the log files are and how many are written.
(see
Using The UAS for information on configuration)
By default, up to 50 log files are written of 2MB maximum size. e.g.
UAS_0000.log - UAS_0049.log
In addition to the trace files, Application Data Records (ADRs) are written to the same location
as the diagnostic trace files. These have the form
UAS_ADR_0000.log.
Debugging
TODO!!!
An application is always supplied with a single primary channel. It is possible to configure
a service to use additional secondary (extra) channels to make outgoing calls which can, for
instance, then be connected to the primary call.
When registering an application via
Inbound Services or
Outbound Services, the number of extra channels
required can be defined. An application can access the resultant call channels via the getExtraChannels()
method of the
UASCallChannel class.
For example
UASCallChannel otherChannel = channel.getExtraChannels()[0];
if (otherChannel.call(otherDestinationAddress) == CallState.Answered)
{
    // Connect the calls together
    channel.connect(otherChannel);
}
Text To Speech (TTS)
The Aculab Cloud supports Text To Speech (TTS), allowing quick and easy application prototyping
and, more generally, the ability for your applications to read text to their users.
SSML
The TTS methods support the embedding of Speech Synthesis Markup Language (SSML). This is a very
flexible way of expressing how you would like your text to be spoken. Further details on the SSML features
and voices supported are available in the Aculab Cloud
TTS documentation.
In brief, SSML allows you to do things like:
channel.getFilePlayer().say(
    "<prosody rate='x-slow'>
        This is me speaking slowly.
     </prosody>");
channel.getFilePlayer().say(
    "<prosody pitch='+50%'>
        This is me speaking with a very high pitch.
     </prosody>");
Media files to be played to a call or recorded from a call reside on the cloud.
An application can perform some simple manipulation of these files via
getFileManager()
of
UASApplication.
This class enables the application to rename and delete files and check for their existence.
For example:
if (this.getFileManager().exists(recordFileName))
{
    this.getFileManager().deleteFile(recordFileName);
}
Additionally, the Aculab Cloud provides
Web Services access to Media Files
that can be used to download, list upload, rename or delete files. See the ManageMediaFiles in
Web Service API Application Samples
The Aculab Cloud accesses media files via a highly reliable, distributed storage system.
The way it works will generally be transparent to you as an application writer, but there
are a few important things to bear in mind:
-
When recording a new file within a telephone call, it will be available for use immediately
in that call, and within 60 seconds in other calls, from cloud.aculab.com and from the Web Services API.
-
When writing a new file via cloud.aculab.com
or Web Services API, it will be available for
access within 60 seconds from the completion of the write.
-
When deleting or overwriting an existing file, the change will take up to 15 minutes to
become available across the distributed storage system. Until this has been accomplished
some telephone calls may continue to access the old version.
-
While these levels of delay may be fine when you've just pushed a new version of your
'Hello caller, what would you like to do?' wav file onto the Cloud via the Cloud Web
Portal or Web Services API, it may not be so helpful when you've just recorded a
voicemail and the intended recipient dials into the system soon after to receive it.
So, for cases where you need to access new media files quickly, please make
them new files by using new filenames.
-
It's generally a good idea to organise your media files into directories.
The directory delimiter is "/", as in "intro/hello.wav".
Directories are created and destroyed on demand by the storage system so, assuming that the 'intro'
directory doesn't exist, channel.FileRecorder.record("intro/hello.wav") would create that directory
and file_man.delete_file("intro/hello.wav") would remove it along with the file.
Call Transfer
The ability to transfer a call is provided in the form of retrievable transfer.
This re-routes the audio to another destination but maintains control over the
call, allowing it to be retrieved.
This kind of transfer requires an Extra Channel in the Idle state to be supplied.
The Transfer method makes a call to a supplied target address and transfers the
audio connection from the call making the transfer to that target. However it retains
control of the lifetime of the call (this is known as Third Party Call Control in the
SIP world).
This means that the audio connection can be retrieved at a later time. Additionally,
the audio connection returns to the original call automatically, if the target
of the transfer hangs up.
Retrievable transfer is often used in scenarios where an operator creates a call that
connects two participants together and in conferencing.
Conferencing
The Aculab Cloud supports conferencing together two or more calls (parties) within an entity called
a
conference room for which you provide an identifying name.
Within each conference room a
conference entity controls the audio mix that each party hears.
A number of options can be set for each party as they
enter the conference room
(these are shown here in green).
Conference Room
A conference room is
Created when the first party enters, either by
transferring an existing call or by placing a new call to that room.
See:
UASCallChannel.
For example:
channel.transferToConference(
    "BobsConferenceRoom",
    channel.getExtraChannels()[0]);
A conference room is
Destroyed if a party exits that is configured to
Destroy On Exit or if the last remaining party exits.
When a conference room is destroyed any remaining parties are automatically hung up.
A party exits a conference room either by hanging up or by retrieving its call.
See:
UASCallChannel.
For example:
channel.hangUp();
or
CallState state = channel.retrieveTransferredCall();
if (state == CallState.Answered)
{
    // Call has been retrieved from conference
    ...
}
- Although the name chosen for a conference room is unique to your user account, you are strongly advised
to provide a different name for each one.
(This avoids various potential issues, for example, where a caller stays in one conference
longer than expected and is suddenly introduced into a supposedly new conference as new callers ring in)
- When transferring into a room, a Ringback Tone can be
configured to play while the call is ringing
- When a call is hung up it exits the conference room
- A party can be configured to exit the room when they hit a specified keypad digit
(Exit On DTMF Digit)
- A party may be a human or an application, such as one that records a conference room
Conference
Each conference room contains a single conference that has two states:
Started and
Stopped.
It is initially in the
Stopped state.
While
Started all parties in the conference room can either listen or talk and listen.
While
Stopped the parties cannot hear each other. Each party may have an
On Conference Stopped File configured to play in this state. An example
would be holding music.
A conference
Starts:
When a conference room contains at least two parties, at least one talker and at least one
party configured to
Start On Entry.
A conference
Stops:
When the number of parties goes below two
or if there are no talkers left in the room. Any parties remaining in the Stopped conference will hear their
On Conference Stopped File if configured
Conference Party Options
When entering a conference room, a number of options determine how the party affects
the conference and how the conference interacts with the party:
| Party Type |
The type of participation this party can take in the conference - TalkerAndListener or Listener |
| Lifetime Control |
The control that this party has on the lifetime of the conference and conference room. One of:
| None |
The party does not directly affect the lifetime of the conference |
| Start On Entry |
The conference may start once this party has entered the conference room |
| Destroy On Exit |
The conference stops and the conference room is destroyed when this party exits |
| Full Control |
The conference may start once this party has entered the conference room and
the conference room will be destroyed when this party exits |
|
| Ringback Tone |
The ring tone, if any, that's heard by this party while the call to the room is ringing |
| On Conference Stopped File |
An optional name of a media file that is played to the party (looping) while the conference is stopped |
| Beep On Entry |
Whether a beep is played to the room when this party enters a started conference |
| Exit On DTMF Digit |
A DTMF digit that, if provided, allows this party to exit the conference room by pressing the specified digit (e.g. '*') |
| Mute On DTMF Digits |
An optional pair of DTMF digits that allow the party's audio contribution to the conference to be muted and unmuted
when one of the specified digits is hit |
| On Entry Media |
An optional name of a media file or some TTS that is played to a started conference immediately before the party enters it
(and after the Beep On Entry, if configured) |
| On Exit Media |
An optional name of a media file or some TTS that is played to a started conference immediately after the party exits it |
| Prefix Media |
An optional name of a media file or some TTS that is played to a started conference immediately before the On Entry Media or On Exit Media |
For example:
// Create media settings to specify all options
ConferencePartyMediaSettings settings =
    new ConferencePartyMediaSettings(
        channel.getPredefinedToneSequences().get(PredefinedTones.RingbackUnitedKingdom),
        "onHoldMusic.wav",                        // file to play when stopped
        true,                                     // beep enabled
        '#',                                      // exit on a #
        new ConferencePartyMuteDigits('1', '2'),  // Mute on 1, unmute on 2
        PlayableMedia.textToSay("Bob "),          // Prefix
        PlayableMedia.textToSay("has entered the conference"),
        PlayableMedia.textToSay("has exited the conference"));
See:
ConferencePartyType,
ConferenceLifetimeControl,
ConferencePartyMediaSettings,
ConferencePartyMuteDigits.
Fax
Sending and receiving faxes on a call is supported on the Aculab Cloud
and needs to be enabled via the
Enable fax send and/or
Enable fax receive
options in the
Fax tab of the invoking Inbound or Outbound service.
Typically faxes are only sent on outgoing calls and received on incoming calls.
Note that enabling either of these will result in the application being charged
at a different platform rate.
Sending a Fax
Enabling fax send in a service creates an empty
FaxToSend
fax document object as a property of the invoked
UASApplication.
The content of this object can be built up from TIFF files that have been stored
on the cloud and text can be added to selected pages.
It can be sent using the
FaxSender property of
a call channel.
For example:
 this.getFaxToSend().setContent("myFaxTxDocument.tif");
 channel.getFaxSender().send(this.getFaxToSend());
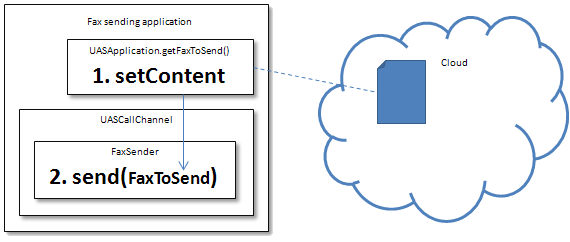
Also see the
OutboundSendFax
application sample.
Receiving a Fax
Enabling fax receive in a service creates a
FaxToReceive
fax document object as a property of the invoked
UASApplication.
The filename of this object must be set, then a fax can be received using the
FaxReceiver property of a call
channel.
For example:
 this.getFaxToReceive().setFileName("receivedFax1.tif");
 channel.getFaxReceiver().receive(this.getFaxToReceive());
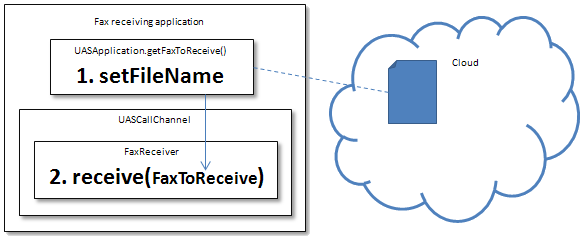
Also see the
InboundReceiveFax
application sample.
Advanced Fax Options
Typically faxes can be sent and received without recourse to changing the
Fax Options.
However, where circumstances require it, the default fax options for a service can be
altered from the
Fax tab of
Inbound Services and
Outbound Services.
These defaults may be overriden per application instance via the
FaxOptions
class that can be passed to the FaxSender or FaxReceiver. Option names and value ranges
must match those available on the Service Fax tab.
See
Sending & Receiving Faxes
for more information.
High Level API
This release contains a BETA release of a high level api that provides additional
high level functionality on top of the standard UASCallChannel.
The
CallChannelHelper
class has methods that implement typical operations such as capturing a number from the
caller, playing a menu to the caller and making an outgoing call and connecting it
immediately to an existing call.
For example:
 CallChannelHelper channelHelper = new CallChannelHelper(this, channel);
 channel.getFaxReceiver().receive(this.getFaxToReceive());

 // Establish a target address
 CallTarget callTarget = CallTarget.sipAddressToCall(
    "sip:bob@acompany.com", "sip:bill@anothercompany.com");
 channelHelper.callAndConnect(callTarget,
    channel.getExtraChannels()[0], 120);